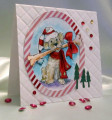
I printed the mouse onto a piece of mixed media paper, and die cut it with an oval die. I made sure the string for the ornament went off the edge of the oval, just to help "ground" the image a bit. I used my Mission Gold watercolors to paint the ornament & string, and one of the Starry Colors watercolors to paint the ornament topper. I used my Prismacolor pencils to color in the mouse, just to get some added texture in the coloring.
I cut a panel of patterned paper to size, & used the "Leaf" Sew Ribbon tool to punch the holes for my ribbon. I wove the ribbon across the bottom of the panel, and adhered the ends to the back. I also added a snowflake button (that I'd cut the button shank off of) at the end of the ribbon, just for a little something extra. I double-matted the panel with teal & red cardstocks. Then I adhered that to my white card base. I glued the oval on, and this card was done!
Date: Sunday, November 18, 2018 GMT Views: 528
Favorited:3
Registered: February 3, 2005 Location: Delray Beach, FL Posts: 34769
Tue, Nov 20, 2018 @ 3:34 PM
Andrea, what a sweet card! I love this little ornament mouse and your fabulous coloring! Yes, it definitely grounded the mouse/ornament. And what a beautiful layout with the DP and that gorgeous ribbon treatment. I love it! Hugs and love! xoxo
------------------------------ Cheryl
Proverbs 3:5-6 My blog
Registered: August 10, 2006 Location: Sunny Florida Posts: 25290
Thu, Nov 22, 2018 @ 5:52 PM
Andrea, what a gorgeous little mouse and ornament image that is colored so beautifully. The mouse appears to be swinging on the ornament. LOL. The patterned paper is gorgeous and a great background for the image. I love the woven ribbon at the bottom of the card. I love the card, Andrea!